How to use Paths?
Introduction
Commonly, the robot's motion during autonomous routines is simple.
For example:
- Drive a certain distance.
- Turn a certain number of degrees.
Driving and turning are fundamental to programming an autonomous routine. Both motion functions can be very accurate; however, when we use both functions, you'll notice that the robot needs to stop to follow the next instruction. If the robot needs to follow a more complicated routine, it will need to make a lot of simple movements, wasting more time during the autonomous period. We need to remember that time is valuable.
What is a path?
To program more complex motion functions, we can create and plan paths. A path is a series of waypoints, where each point is defined by its position in (X, Y) format. Each point serves as a target that we want the robot to follow.
Coding
Creating and using paths is possibly with Lightning.
The logic behind the programming of this class is based in the Paper: Implementation of the Adaptive Pure Pursuit Controller by DAWGMA FRC team.
Creating a path
You can create a path using the Path constructor. This constructor requires the waypoints and other important parameters.
Don’t worry about adding too many waypoints; try to add just enough to clearly define the path you want the robot to follow. The Path class has different functions that upgrade your path, increasing the mount and qualitfy of points.
The units for the x and y coordinates must to be in inches.
lightning::Path goal_path (
    {0,0,24,48}, //X: A vector that includes the x coordinates of each point.
    {0,24,48,64}, //Y: A vector that includes the y coordinates of each point.
    false, //A boolean flag indicating if the path should be reversed. True if reversed
    3 //The space that would exist between each point for the injection method
    );
Is recommended that the first point of your path be the same as the current robot location.
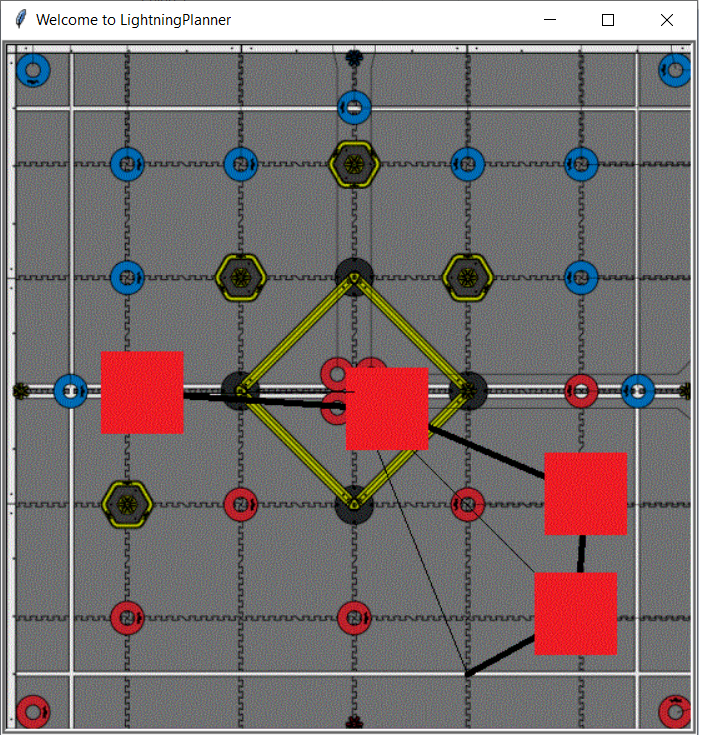
Also you can use the Lightning Planner utility to create your path more easily.Planning your autonomous routine directly from your computer, eliminating the need for field measurements.
Upgrading the path
Using the update() function, we can have an upgraded form of any Path.
lightning::Path goal_path ({0,0,24,48}, {0,24,48,64}, false, 3);
void autonomous(){
    goal_path.upgrade();
}
What is important to upgrade my path?
The path created may have sharp corners, making it more difficult for your robot to follow. Upgrading the path allows the robot to follow it more quickly and precisely.
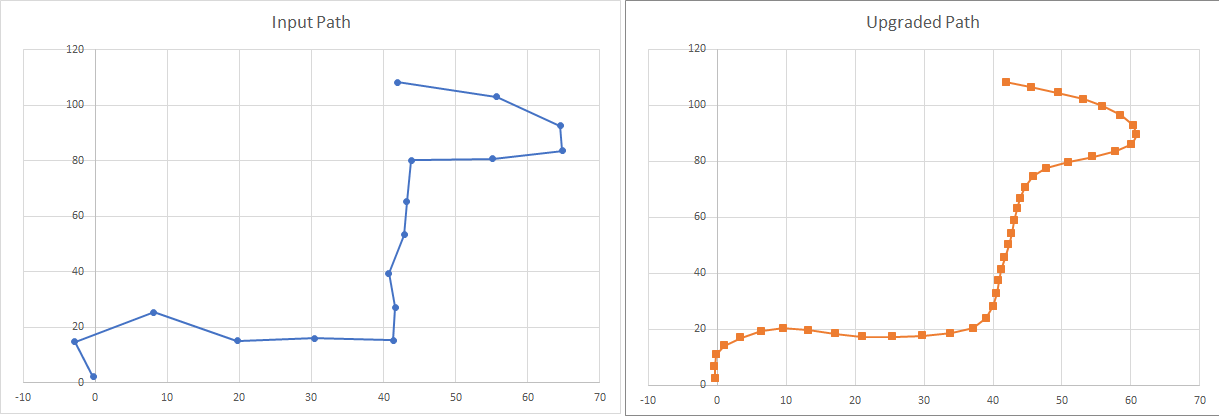
As you can see, The normal path has been injected with additional points and optimizaded.
The amount of inyected points it depends on the _spacing that was declared in the constructor.
Making the math 🤓
We have planned our path, but we need to perform some mathematical calculations to complete the work.
This process is known as the Motion Profile. Here, we calculate the desired linear velocity that our robot needs to achieve in order to follow the path accurately.
The algorithms used in this process calculate the desired velocity based on the maximum linear velocity we set and the curvature of the path. This ensures that when the robot encounters a curved segment of the path, it will slow down appropriately to navigate the curve effectively.
Setting the maximum velocity
Is important to set the maximum velocity in (inches/second) units.
lightning::Path goal_path ({0,0,24,48}, {0,24,48,64}, false, 3);
void autonomous(){
    goal_path.upgrade();
    goal_path.set_max_lineal_velocity(10);
}
Making the calcs
Once the maximum velocity is setted is time to use the make_calcs(k) function.
Where k it is constant, how slow you want the robot to go around turns. (aroud 1-5).
lightning::Path goal_path ({0,0,24,48}, {0,24,48,64}, false, 3);
void autonomous(){
    goal_path.upgrade();
    goal_path.set_max_lineal_velocity(10);
    goal_path.make_calcs(1.15);
    pros::delay(20); //Giving some time to make the calculations.
}
Following the path
After we created the path and the math calculations was made. You can command you robot to follow the path using follow_path().
The functions uses a pure pursuit algoritm to navigate the Path.
For this function you need to provide:
- The
Paththat you want to follow. - The
LookAheadDistance. Check the next site for more information about it.
lightning::Path goal_path ({0,0,24,48}, {0,24,48,64}, false, 3);
void autonomous(){
    goal_path.upgrade();
    goal_path.set_max_lineal_velocity(10);
    goal_path.make_calcs(1.15);
    pros::delay(20); //Giving some time to make the calculations.
    my_chassis.follow_path(goal_path,18); //Following goal_path with a lookaheadistance of 18 inches.
}
Going backwards?
During path navigation, the robot will maintain its current direction. If you want the robot to follow the path while moving backward, make sure to set the _reverse parameter to true in the constructor.
lightning::Path goal_path (
    {0,0,24,48}, //X: A vector that includes the x coordinates of each point.
    {0,24,48,64}, //Y: A vector that includes the y coordinates of each point.
    true, //A boolean flag indicating if the path should be reversed. True if reversed
    3 //The space that would exist between each point for the injection method
    );
Printing
You can print in the integrated terminal the waypoints of your Path using the std::ostream<< operator.
lightning::Path goal_path ({0,0,24,48}, {0,24,48,64}, false, 3);
void autonomous(){
    std::cout<<goal_path; //Printing the normal path.
    goal_path.upgrade();
    goal_path.set_max_lineal_velocity(10);
    goal_path.make_calcs(1.15);
    pros::delay(20); //Giving some time to make the calculations.
    std::cout<<goal_path; //Printing the upgraded path
}
Using additional functions
There are additional functions that Lightning doesn’t use for path following but might be useful if you want to develop your own path-following method.
These additional functions are:
calc_target_angular_velocities()get_target_angular_velocities()get_target_angular_velocity_at()
These functions are designated to calculate and manage the target angular velocity in each point.
Results
During the Over Under Season, our team ITESM1 achieved outstanding performance by using paths, significantly improving our autonomous routines.
We found that using paths allow us to program more efficient autonomous routines.
ITESM1 OVER UNDER Worlds Autonomous Routine
You finished the tutorial 🎓!
You finished the tutorial! Now you can start using Paths in your code.
For more information check the Path Documentation.