Programming the Driver period
In Head-to-Head Matches, two (2) Alliances—one (1) “red” and one (1) “blue”—composed of two (2) Teams each, compete in Matches consisting of a fifteen (15) second Autonomous Period followed by a one minute and forty-five second (1:45) Driver Controlled Period.
The Driver Controlled Period is one of the most important aspects in VEX. For that reason, Lightning provides the ability to easily program the driver period for your drivetrain using various configurations that can help you.
In this tutorial, you will learn how to program the driver period using Lightning.
Ensure you have declared your drive train
You are not sure to how declare your chassis?, check the Declaring your chassis tutorial.
Your chassis declaration needs to be global. This means that each function can interact with your chassis. The easiest way to do this is to make your chassis declaration at the top of the main.cpp file.
You need more information about Global Variables? check this for more details.
#include "main.h"
//Here is your drive-train
//Declaring a simple drive train
lightning::TankChassis my_chassis(
 //Odometry configuration
lightning::tank_odom_e_t::ADI_ONE_ODOM,
//Declaration of drivetrain motors
{-11,-12,-13,-14}, //Left side ports (using a negative number will reverse it!)
{20,19,18,17},    //Right side ports (using a negative number will reverse it!)
5,   //IMU port
pros::E_MOTOR_GEAR_600, //Which motor cartride are you using, blue,red,green?
3.25, //Wheel Diameter
1.3333, //what is the gear ratio (Is the result of Driven/Driving, Drive:Driving)
); //Forward tracking wheel  diameter
Once our chassis is declared it is time to program the driver period.
Program in the opcontrol function
Inside main.cpp,you need to locate the opcontrol function. This function is designated for Driver Controlled Period.
#include "main.h"

void initialize() {
}

void disabled() {}

void competition_initialize() {}

void autonomous() {
}

void opcontrol() {
  pros::Controller master(pros::E_CONTROLLER_MASTER);
  while (true) {

  }
}
The code that we will program in the opcontrol function will act in the Driver Controlled Period.
Chose your driver configuration
There are different driver configuration. Choose your favorite!🥳
Currently, lightning supports only tank-drive chassis.
Tank
It is one of the most common driver configurations. Basically, the left joystick controls the left side of the chassis, while the right joystick controls the right side of the chassis.
Coding
Using the TANK function, we can add the tank driver configuration to our robot.
void opcontrol() {
  pros::Controller master(pros::E_CONTROLLER_MASTER);
  while (true) {

   my_chassis.tank(master);

   pros::delay(lightning::util::DELAY_TIME);
  }
}
As a result, we could control our robot using the tank configuration.
Arcade
With the ARCADE configuration, you can control the entire chassis using just one joystick.
Left Arcade
In this configuration, you can control the chassis using the left joystick.
To add the left configuration, you just need to use the arcade() function, passing the first parameter.
void opcontrol() {
  pros::Controller master(pros::E_CONTROLLER_MASTER);
  while (true) {
   my_chassis.arcade(master);

   pros::delay(lightning::util::DELAY_TIME);
  }
}
However, you can specify the configuration using the same function.
void opcontrol() {
  pros::Controller master(pros::E_CONTROLLER_MASTER);
  while (true) {
   my_chassis.arcade(master,E_TANK_OP_ARCADE_LEFT);

   pros::delay(lightning::util::DELAY_TIME);
  }
}
Right Arcade
In this configuration, you can control the chassis using the right joystick.
To add the left configuration, you just need to use the arcade() function as follows:
void opcontrol() {
  pros::Controller master(pros::E_CONTROLLER_MASTER);
  while (true) {
   my_chassis.arcade(master,E_TANK_OP_ARCADE_RIGHT);

   pros::delay(lightning::util::DELAY_TIME);
  }
}
Double Arcade
This configuration allows you to control robot´s forward and backward direction with the left joystick´s Y-axis, and control the turning direciton with the right right joystick´s X-axis.
Although you can't control the chassis using just one joystick with the double arcade configuration, it is still considered an arcade configuration in the library for practice purposes.
To add the double configuration, you just need to use the arcade() function as follows:
void opcontrol() {
  pros::Controller master(pros::E_CONTROLLER_MASTER);
  while (true) {
   my_chassis.arcade(master,E_TANK_OP_ARCADE_DOUBLE);

   pros::delay(lightning::util::DELAY_TIME);
  }
}
Double arcade alternative
This configuration allows you to control robot´s forward and backward direction with the right joystick´s Y-axis, and control the turning direciton with the left right joystick´s X-axis.
This is an alternative way to drive the chassis, istead of using the default double configuration.
To add the double configuration, you just need to use the arcade() function as follows:
void opcontrol() {
  pros::Controller master(pros::E_CONTROLLER_MASTER);
  while (true) {
   my_chassis.arcade(master,E_TANK_OP_ARCADE_DOUBLE_ALTERNATIVE);

   pros::delay(lightning::util::DELAY_TIME);
  }
}
Adding rates to arcade configurations
When the robot moves too quickly, controlling the chassis can become challenging. To address this, you can adjust the rates to modify the joystick output, which will help slow down the robot.
For instance, you might want to reduce the sensitivity for turning while maintaining the same output for forward and backward movement.
This feature can be added to the differents arcade configurations using the arcade function with all the parameters.
void arcade(pros::Controller& control,
    const lightning::tank_op_arcade_e_t arcade = lightning::E_TANK_OP_ARCADE_LEFT ,
    const float power_rate=1, const float turn_rate=1);
Where:
| Parameters | |
|---|---|
control | The control. |
arcade | The tank_op_arcade_e_t to set for the chassis. |
power_rate | The rate for the forward and backwards movements (Default is 1). |
turn_rate | The rate for the right and left turns (Default is 1). |
If power_rate and turn_rate are both set to 1, there will be no modification to the output.
Examples
Let's suppose you want to limit the turning power while still using the full power for forward and backward movements. For example, you might decide to use only half of the power for turning.
The code will look as follows:
- Left Arcade
- Right Arcade
- Double Arcade
void opcontrol() {
  pros::Controller master(pros::E_CONTROLLER_MASTER);
  while (true) {
   my_chassis.arcade(master,E_TANK_OP_ARCADE_LEFT,1,.5);

   pros::delay(lightning::util::DELAY_TIME);
  }
}
void opcontrol() {
  pros::Controller master(pros::E_CONTROLLER_MASTER);
  while (true) {
   my_chassis.arcade(master,E_TANK_OP_ARCADE_RIGHT,1,.5);

   pros::delay(lightning::util::DELAY_TIME);
  }
}
void opcontrol() {
  pros::Controller master(pros::E_CONTROLLER_MASTER);
  while (true) {
   my_chassis.arcade(master,E_TANK_OP_ARCADE_DOUBLE,1,.5);

   pros::delay(lightning::util::DELAY_TIME);
  }
}
Arcade with exponential
You may notice that simply using rates is not the most effective way to control your chassis. This is because applying rates always reduces the robot's velocity. In short, you will never fully utilize your drive-train while using rates.
However, there is a different approach that allows you to have more precise control while using 100% of your chassis power.
To achieve this, we use the following equation:
This function smooths the joystick input based on a specified exponent and maximum value. The smoothing function adjusts the joystick value to create a more gradual response.
If we plot the equation´s output, we get this:
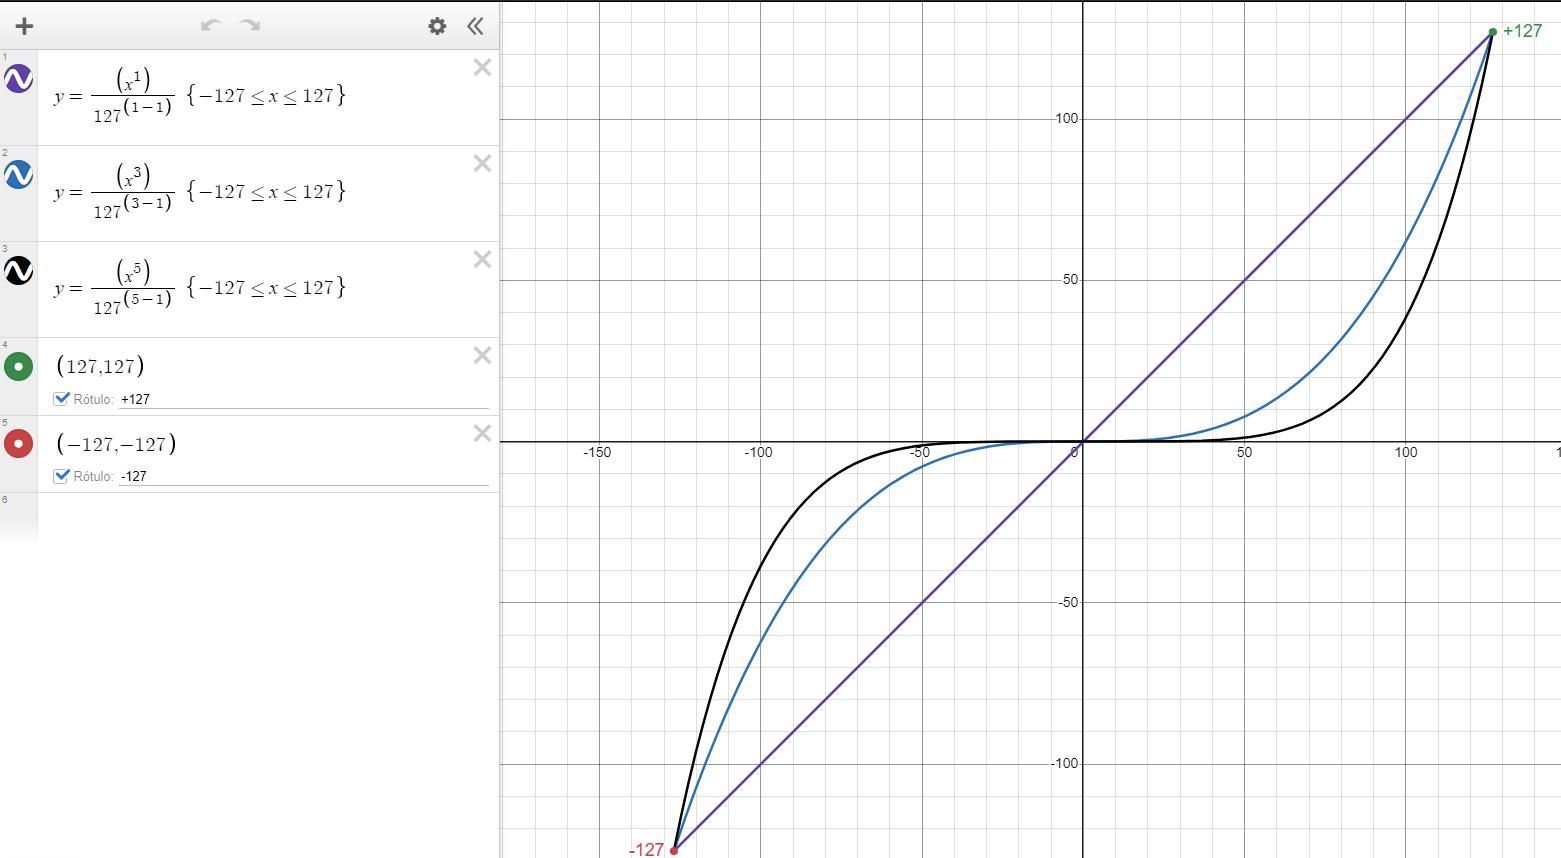
You may notice that as we increase the exponent, the output becomes smoother. Additionally, if the exponent is an even number, the output function will be purely positive. However, don't worry; in the template, you can use odd or even numbers without any issues!
You can see more information about this equation here.
Also thanks to _Colossus for providing valuable information!
Well and how i use it 🤔?
Easy, just use arcade_exponential()!.
Function prototype
void arcade_exponential(pros::Controller &control,
                                     const lightning::tank_op_arcade_e_t arcade,
                                     int n_x,
                                     int n_y)
Where:
| Parameters | |
|---|---|
control | The control. |
arcade | The tank_op_arcade_e_t to set for the chassis. |
n_x | The exponential for the joystick x axis. |
n_y | The exponential for the joystick y axis. |
With that established, in this function you can set an arcade configuration and then select the exponential for each movement(turns or backward-forward). For example, if you want smoother output from turns , you should increase n_x, and if you want to increase the smoothing for forward and backward movement you have to increase n_y.
If you want a normal output, set the corresponding exponent (n_x or n_y) to 1.
Examples
Lets suppose that we want a smoother output for turns.
- Left Arcade
- Right Arcade
- Double Arcade
void opcontrol() {
  pros::Controller master(pros::E_CONTROLLER_MASTER);
  while (true) {
   my_chassis.arcade_exponential(master,E_TANK_OP_ARCADE_LEFT,3,1);

   pros::delay(lightning::util::DELAY_TIME);
  }
}
void opcontrol() {
  pros::Controller master(pros::E_CONTROLLER_MASTER);
  while (true) {
   my_chassis.arcade_exponential(master,E_TANK_OP_ARCADE_RIGHT,3,1);

   pros::delay(lightning::util::DELAY_TIME);
  }
}
void opcontrol() {
  pros::Controller master(pros::E_CONTROLLER_MASTER);
  while (true) {
   my_chassis.arcade_exponential(master,E_TANK_OP_ARCADE_DOUBLE,3,1);

   pros::delay(lightning::util::DELAY_TIME);
  }
}
Ready to drive! 🏎️
Congratulations, with this guide you now are able to do:
- Programing the driver period.
- Use tank configuration.
- Use different arcade configurations.
- Use an exponential method to smooth your joystick output for more control.